Portfolio Capstone: From Brief to Finished Campaign
Combine everything into a complete client-style project: interpret a brief, plan a visual direction, create assets, revise and export professionally.
Before you start
Open Canva in a separate tab and complete the actions while you read. This course is designed for active practice, not passive scrolling. Keep one folder named Canva Course Practice and save every module project there.
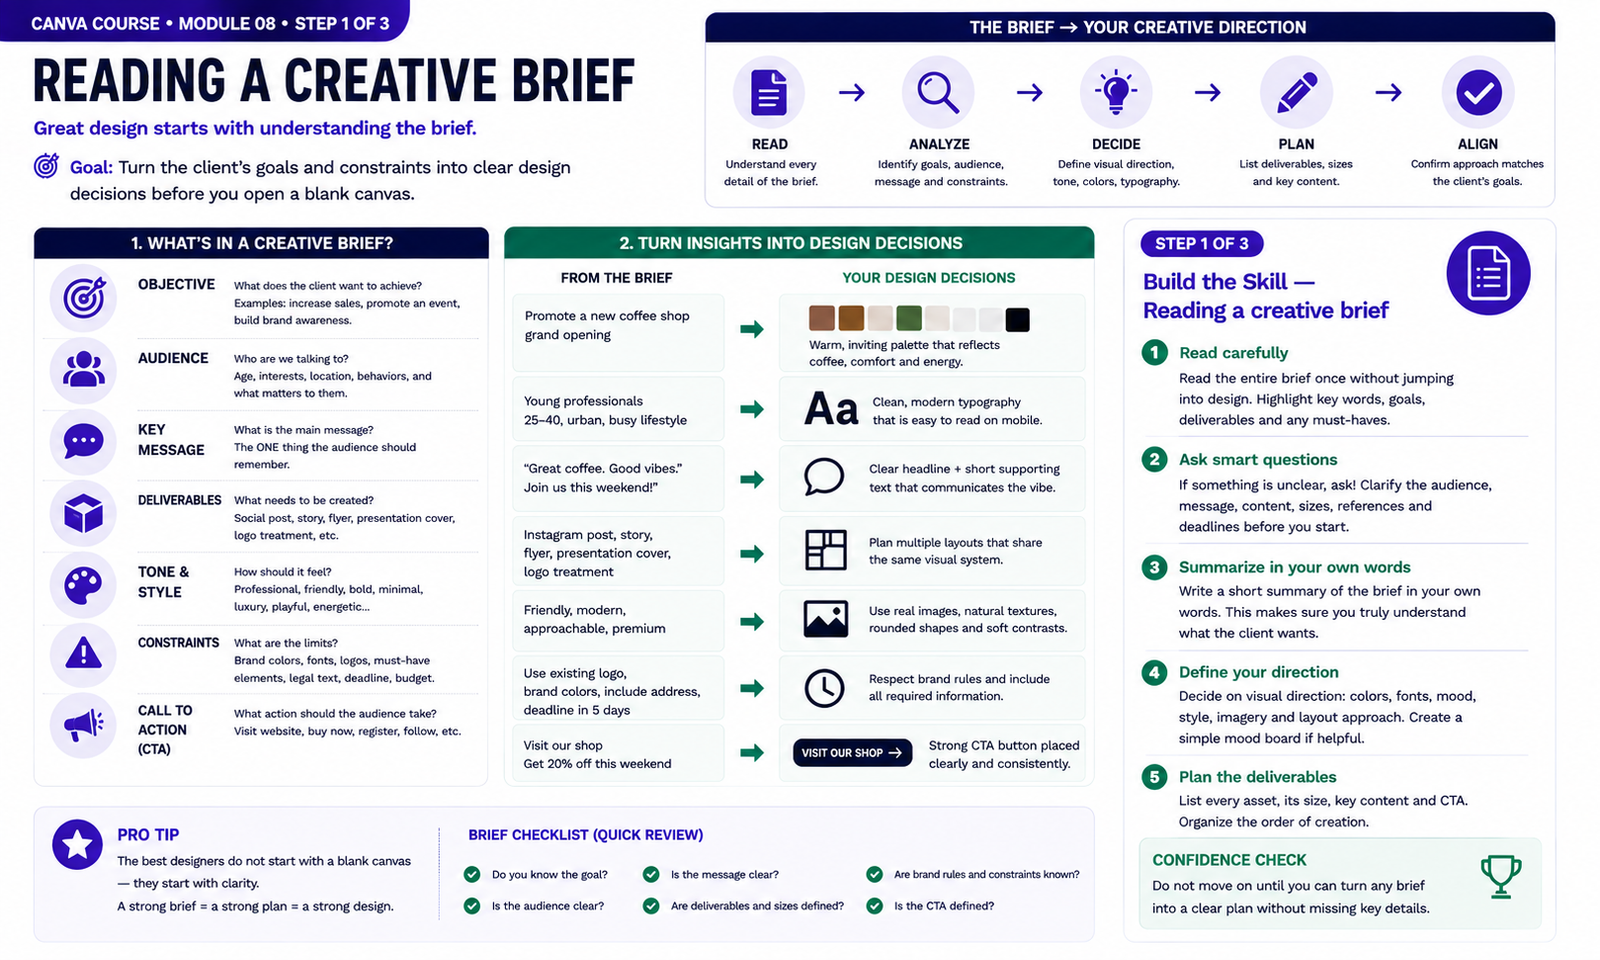
Build the Skill — Reading a creative brief
- Read the complete creative brief before opening a blank design. Identify the objective, target audience, key message, required deliverables, tone, brand rules, constraints, deadline and call to action. Highlight anything that directly affects a design decision.
- Translate the brief into a visual direction. Decide which colors, typography, imagery, layout style and overall mood best support the audience and objective. If important information is missing or unclear, identify what you would need to ask the client before beginning production.
- Write a short creative plan in your own words before designing. List every required asset, its format or size, its main message and its call to action. Confirm that your planned visual direction respects the brief before moving into campaign production.
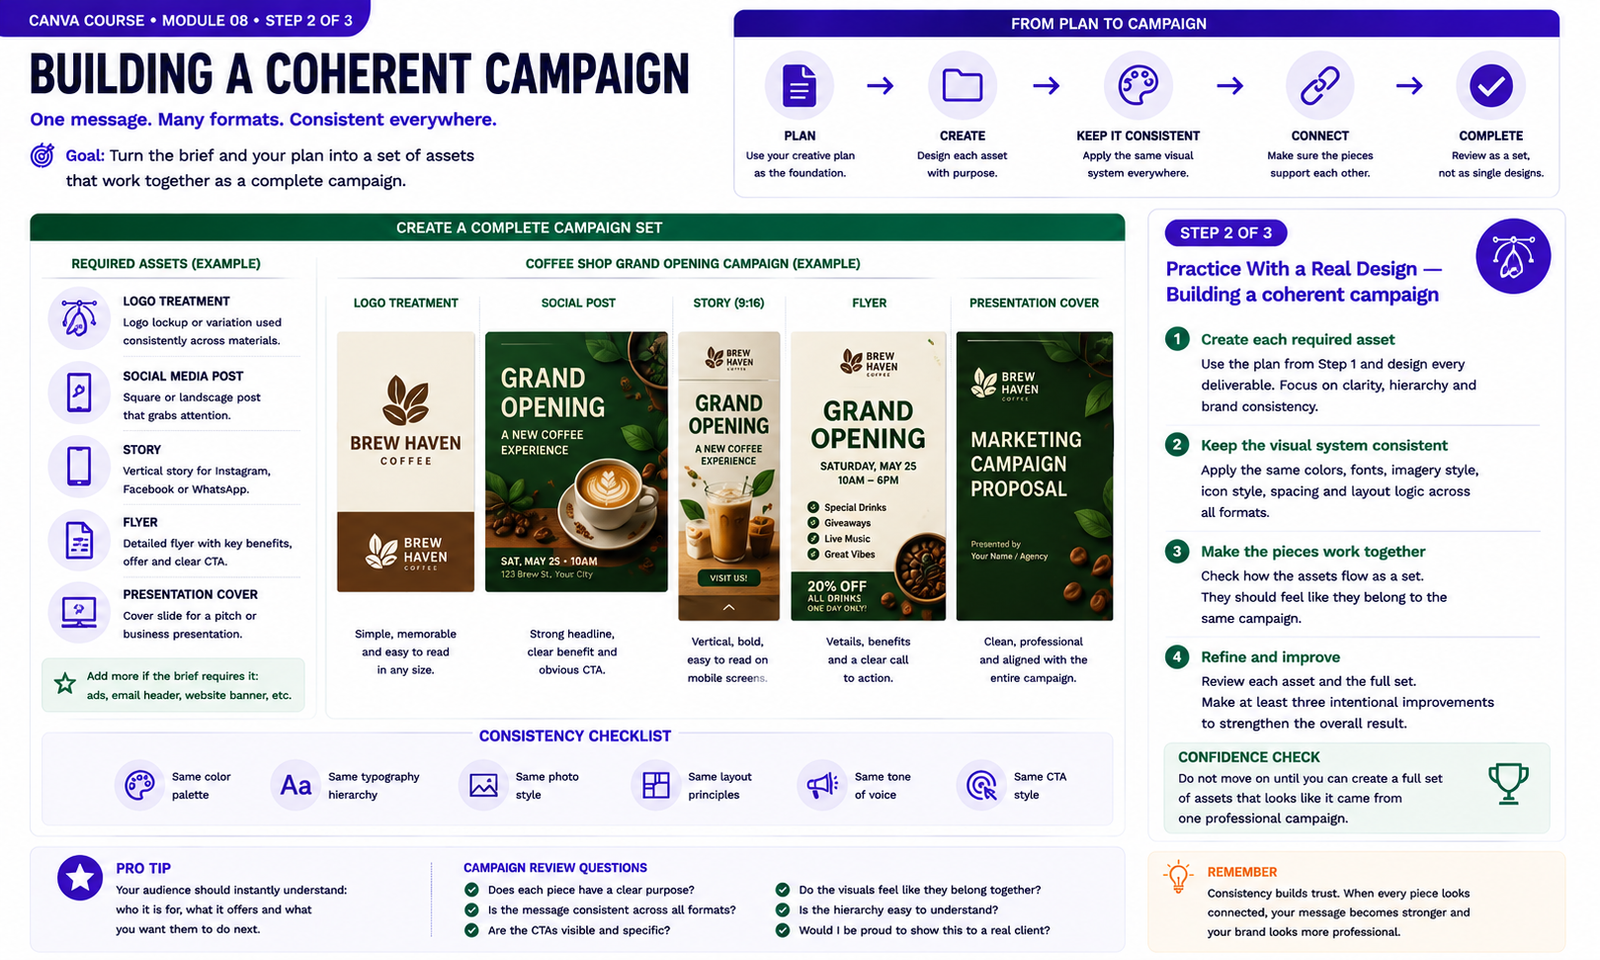
Practice With a Real Design — Building a coherent campaign
- Use the creative plan from Step 1 to build the complete campaign. Create the required logo treatment, social post, vertical story, promotional flyer and presentation cover, giving every asset a clear purpose while keeping the central message consistent.
- Apply the same visual system across every format. Reuse the approved color palette, typography hierarchy, imagery style, icon language, spacing logic and call-to-action treatment while adapting each composition to its specific size and use.
- Review all campaign pieces together instead of judging them separately. Confirm that they clearly belong to the same brand, then make at least three deliberate improvements to hierarchy, consistency, readability or composition before saving the campaign set.
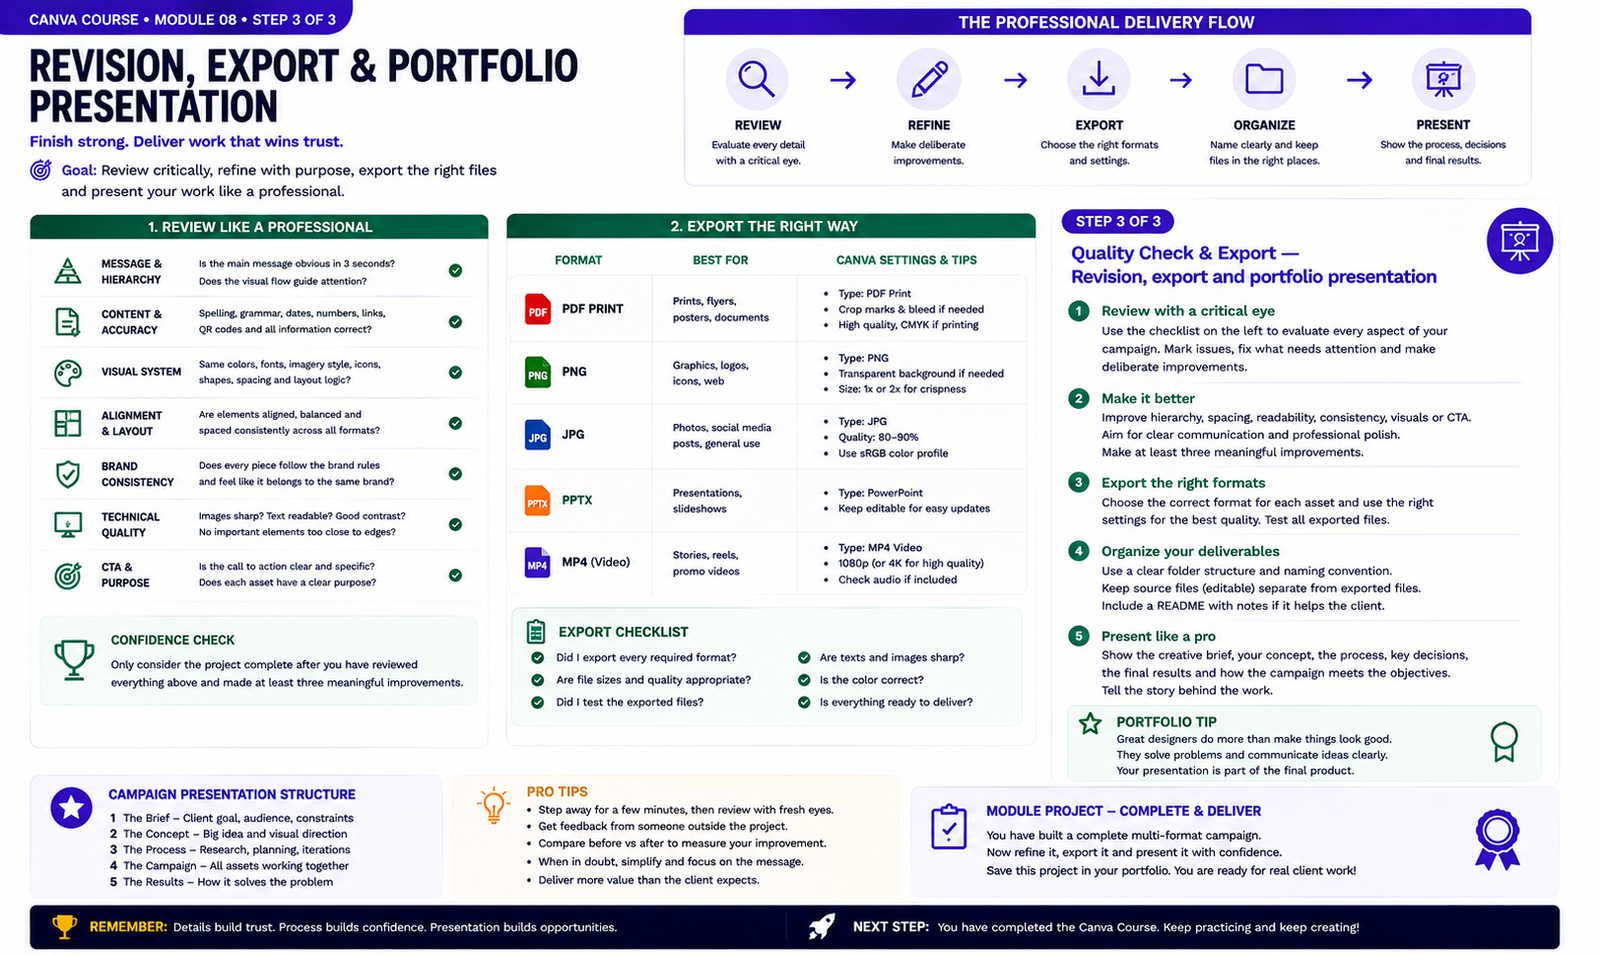
Quality Check & Export — Revision, export and portfolio presentation
- Review the complete campaign with a critical eye before calling it finished. Check message clarity, spelling, dates, links, hierarchy, alignment, spacing, contrast, image quality, brand consistency and calls to action. Compare the pieces together and make at least three meaningful improvements.
- Inspect every asset at its real viewing or print size. Confirm that text remains readable, images are sharp, margins and safe areas are respected and the visual system stays consistent across the logo treatment, social post, story, flyer and presentation cover.
- Export each deliverable in the format appropriate for its purpose, then reopen and test every file. Organize editable source files separately from final exports using clear names. Finish by presenting the project as a portfolio case study that explains the brief, creative direction, process, key decisions and final campaign rather than showing isolated images without context.
Knowledge checkpoint
- Can you explain the main principle of this module in your own words?
- Can you reproduce the core workflow without restarting the lesson?
- Can you identify at least one weak design decision and explain how you would improve it?
- Can you export the result in a format appropriate for its intended use?
Build this before continuing
Complete a final campaign with logo treatment, social post, story, flyer and presentation cover.
Completion standard: create a first version, review it, make at least three deliberate improvements, export the final version and keep both versions so you can see your progress.
Ready to move on?
You are ready when you can complete the module project confidently without depending on the example for every decision. The goal is not memorizing Canva buttons — it is learning to make sound visual decisions on your own.
Portfolio Capstone: From Brief to Finished Campaign: Practical Expansion
Reading and Translating a Creative Brief
A capstone project should begin with a brief rather than with a template. The brief defines the audience, objective, required deliverables, message, brand characteristics and practical constraints. Separate facts from assumptions. If the brief says the audience is young professionals, that information can influence tone and format. It does not automatically determine a particular color or font. Design choices still need justification. Identify the primary communication objective. A campaign designed to generate registrations requires different emphasis from one designed primarily to build awareness. Create a short written summary before entering Canva. State what the audience should understand, feel and do after seeing the campaign. This statement becomes a reference when evaluating design decisions.
Developing the Visual Direction
Before building final assets, explore a visual direction. Collect references for typography, imagery, colors and composition, but avoid copying a finished design. Create a small style board containing candidate colors, fonts, image examples and graphic treatments. Compare the options with the brief rather than selecting them only because they are attractive. Reduce the direction to a manageable system. Select the fonts, palette and core visual devices that will repeat across the campaign. Create one representative design first. It is easier to refine the visual language on one asset before applying an uncertain direction to many deliverables.
Producing a Cohesive Campaign
Once the direction is approved, adapt it across multiple formats. A campaign might include a square social post, story graphic, carousel, presentation cover and promotional PDF. Do not simply stretch one layout into every size. Preserve the identity while reorganizing content for the available space. A vertical story may need a different composition from a square feed post. Keep recurring elements consistent: logo treatment, typography, color roles, image style and calls to action. These repeated signals make the campaign recognizable. As assets accumulate, review them together. A single design can look good independently while still feeling disconnected from the rest of the campaign.
Revision and Client-Style Feedback
Professional work includes revision. Imagine receiving feedback such as make the offer clearer, reduce visual clutter or make the campaign feel more premium. Translate vague comments into specific design actions. For example, clearer may require stronger hierarchy rather than larger text everywhere. More premium may require fewer colors, more whitespace and controlled typography rather than simply adding gold. Keep a copy of the previous version before major revisions. Compare the versions and determine whether the change actually addresses the feedback. Do not make unrelated changes during revision unless necessary. Changing typography, imagery and layout simultaneously makes it difficult to evaluate what improved the design.
Preparing Final Deliverables
Before export, confirm the required dimensions and file formats for every deliverable. Review spelling, dates, prices, contact information and calls to action. Inspect image resolution and make sure text remains readable at realistic viewing size. Check that logos are not distorted and that elements remain inside safe margins. Export the assets using formats appropriate for their use. Open the downloaded files independently and verify that they match the editor. Use descriptive filenames. A final campaign folder should allow another person to understand which file belongs to which platform or purpose without opening every asset.
Presenting the Work in a Portfolio
A portfolio should explain the project rather than display only finished images. Introduce the brief, audience and objective, then show selected decisions and final deliverables. Include enough process to demonstrate thinking. A style board, early composition or before-and-after revision can explain how the final solution developed. Do not include every experimental version. Curate the work so that the strongest decisions remain easy to understand. Finish the case study by describing how the campaign solves the original communication problem. This transforms a collection of Canva graphics into evidence of design reasoning.
Capstone Evaluation
Evaluate the finished campaign using objective questions. Is the primary message clear? Can the audience identify the brand across formats? Is typography readable? Are colors and images consistent? Does every deliverable fulfill its intended purpose? Check technical quality separately from visual quality. Correct dimensions, working links, clean exports and accurate information are part of professional design. Ask whether unnecessary elements can still be removed. Final refinement often involves simplifying rather than adding. A successful capstone demonstrates more than Canva tool knowledge. It shows the ability to interpret a brief, establish a visual system, adapt that system across formats, respond to feedback and prepare professional final files.
Turning the Capstone Into a Real Case Study
The final project should demonstrate not only what was designed but how decisions were made. Begin the case study with the problem: who the audience was, what the campaign needed to communicate and which deliverables were required. This gives the finished visuals a clear context.
Next, show a small selection of process material. A mood board, typography exploration, color system or early layout can demonstrate how the direction developed. Avoid including every experiment. Choose only the pieces that help explain the reasoning behind the final solution.
Explaining Design Decisions
Practice describing choices in terms of purpose. Instead of saying that a color was chosen because it looked good, explain how it supports contrast, brand personality or hierarchy. Instead of saying that a layout is modern, identify the use of whitespace, typography or image treatment that creates that impression.
This type of explanation is valuable in portfolios because it demonstrates that design decisions are intentional. Clients and employers are often interested in how a designer thinks, not only in the appearance of the final graphic.
Creating Portfolio Mockups Carefully
Mockups can help viewers imagine designs in realistic situations, such as a social post on a phone or a presentation displayed on a screen. Use them selectively. The mockup should support the project rather than hide the actual work behind dramatic perspective or decorative scenery.
Include some flat views of the original assets so typography, spacing and details remain easy to inspect. A combination of direct design views and contextual mockups usually communicates the project more clearly than either approach alone.
Final Self-Review
Before considering the capstone complete, return to the original brief and evaluate every requirement. Confirm that all requested formats exist, the message remains consistent and the campaign works as one system. Check technical details such as dimensions, filenames, image quality and text accuracy.
Then review the project as a portfolio piece. Remove weak experiments, organize the strongest visuals in a logical sequence and write a concise explanation of the challenge, process and result. The finished case study should show that you can move from an unclear starting point to a controlled, professional design solution.
Documenting What You Learned
After completing the capstone, write a short project review. Record which decisions worked well, which revisions improved the campaign and which parts of the workflow would be handled differently next time. This reflection turns the final project into a learning tool rather than simply another portfolio image.
Keep the strongest files, the final brief and a few useful process examples together. A well-organized project archive makes it easier to explain your reasoning later and gives you a reference for future campaigns with similar requirements.