Canva Foundations & Workspace Confidence
Learn the Canva interface, document types, editor controls, pages, layers, uploads, folders, autosave, and a clean workflow before designing.
Before you start
Open Canva in a separate tab and complete the actions while you read. This course is designed for active practice, not passive scrolling. Keep one folder named Canva Course Practice and save every module project there.
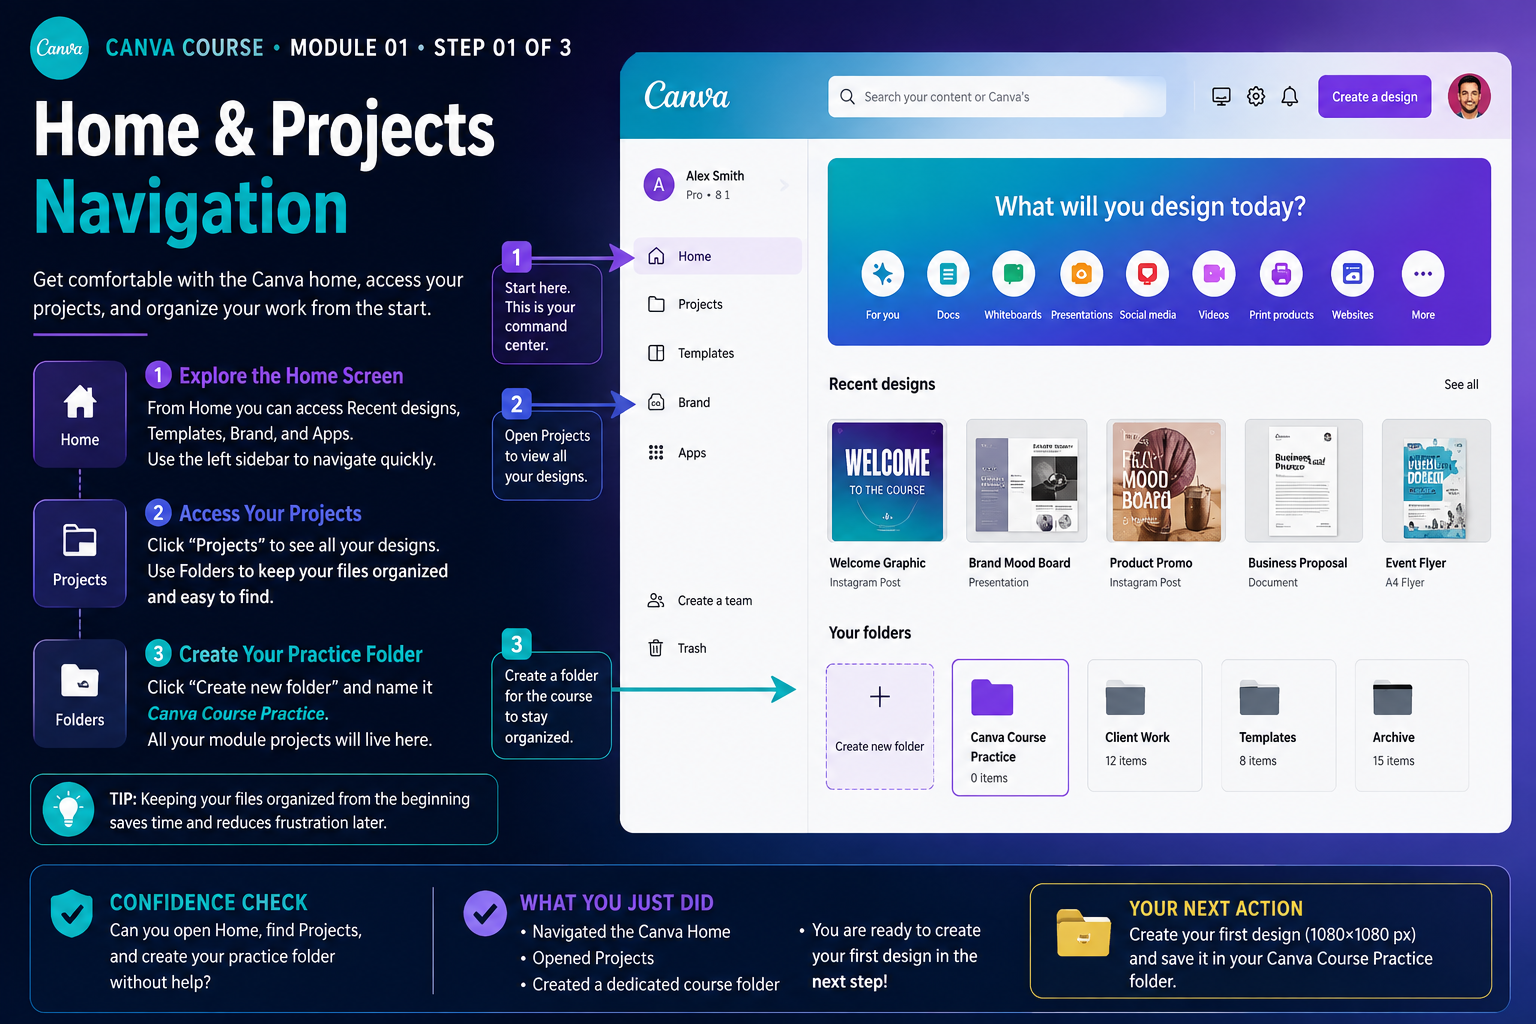
Build the Skill — Home and Projects navigation
- Open Canva and create a fresh practice file instead of editing an old finished design.
- Follow the lesson focus deliberately. Change one variable at a time so you can see what each tool or design decision actually does.
- Save a clean checkpoint before experimenting further. This makes it easy to compare versions and recover from mistakes.
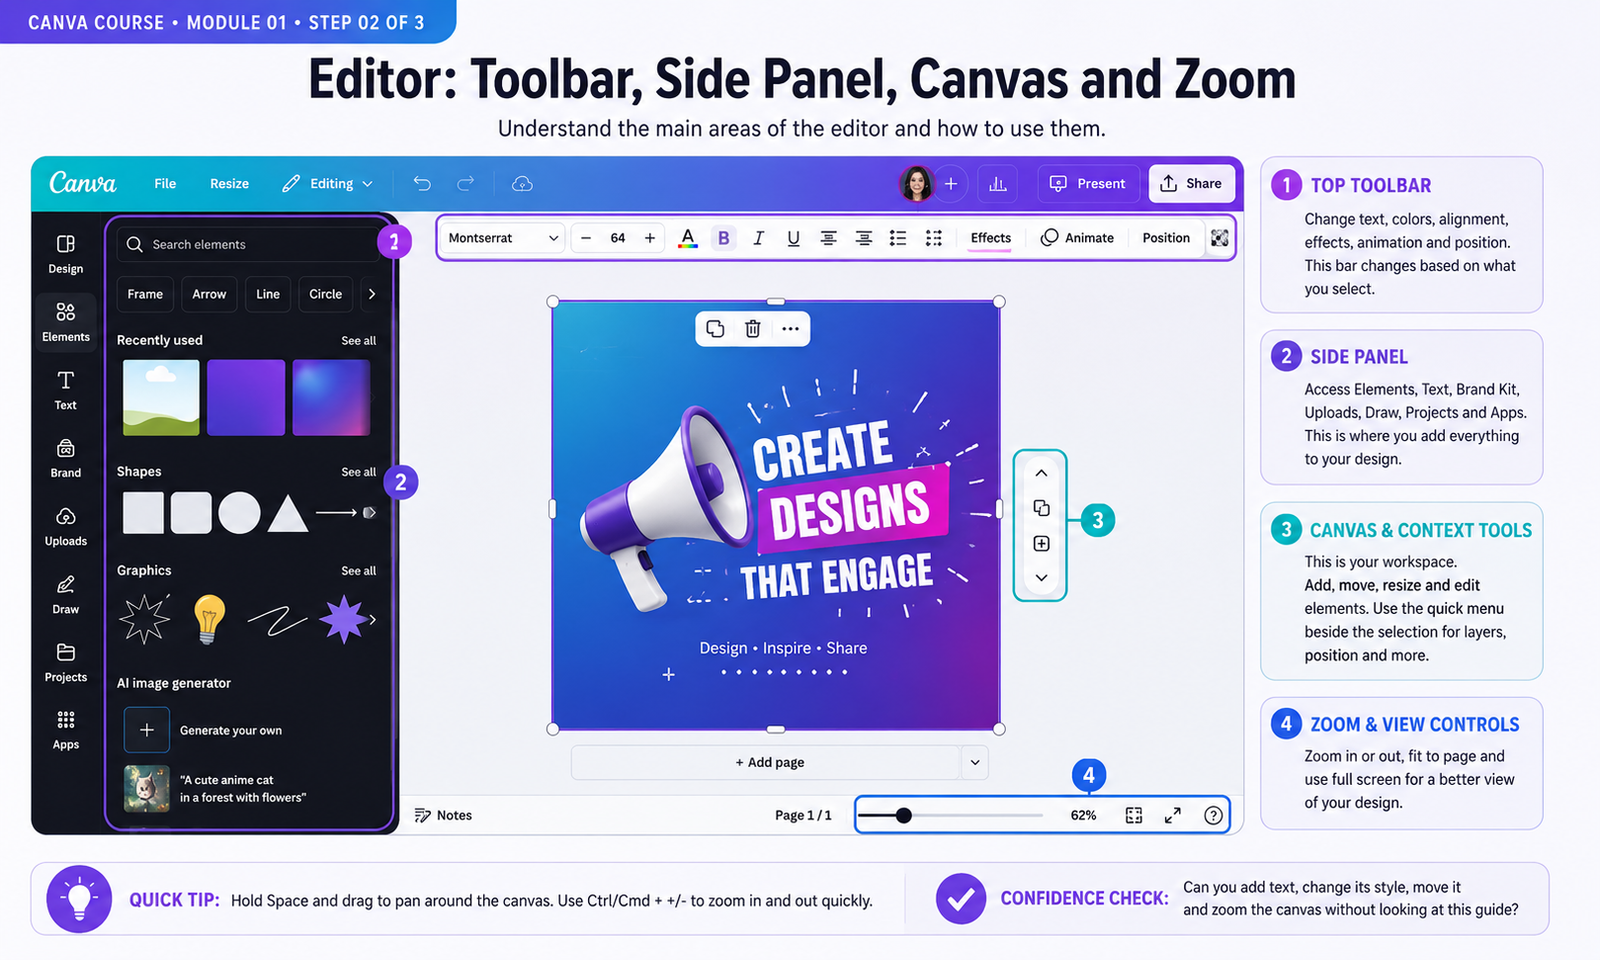
Practice With a Real Design — Editor toolbar, side panel and canvas
- Recreate the demonstrated idea using your own text, colors and assets rather than copying it mechanically.
- Check alignment, spacing, readability and consistency at 100% zoom and again from a distance.
- Make one intentional improvement that was not shown in the example and explain to yourself why it improves the design.
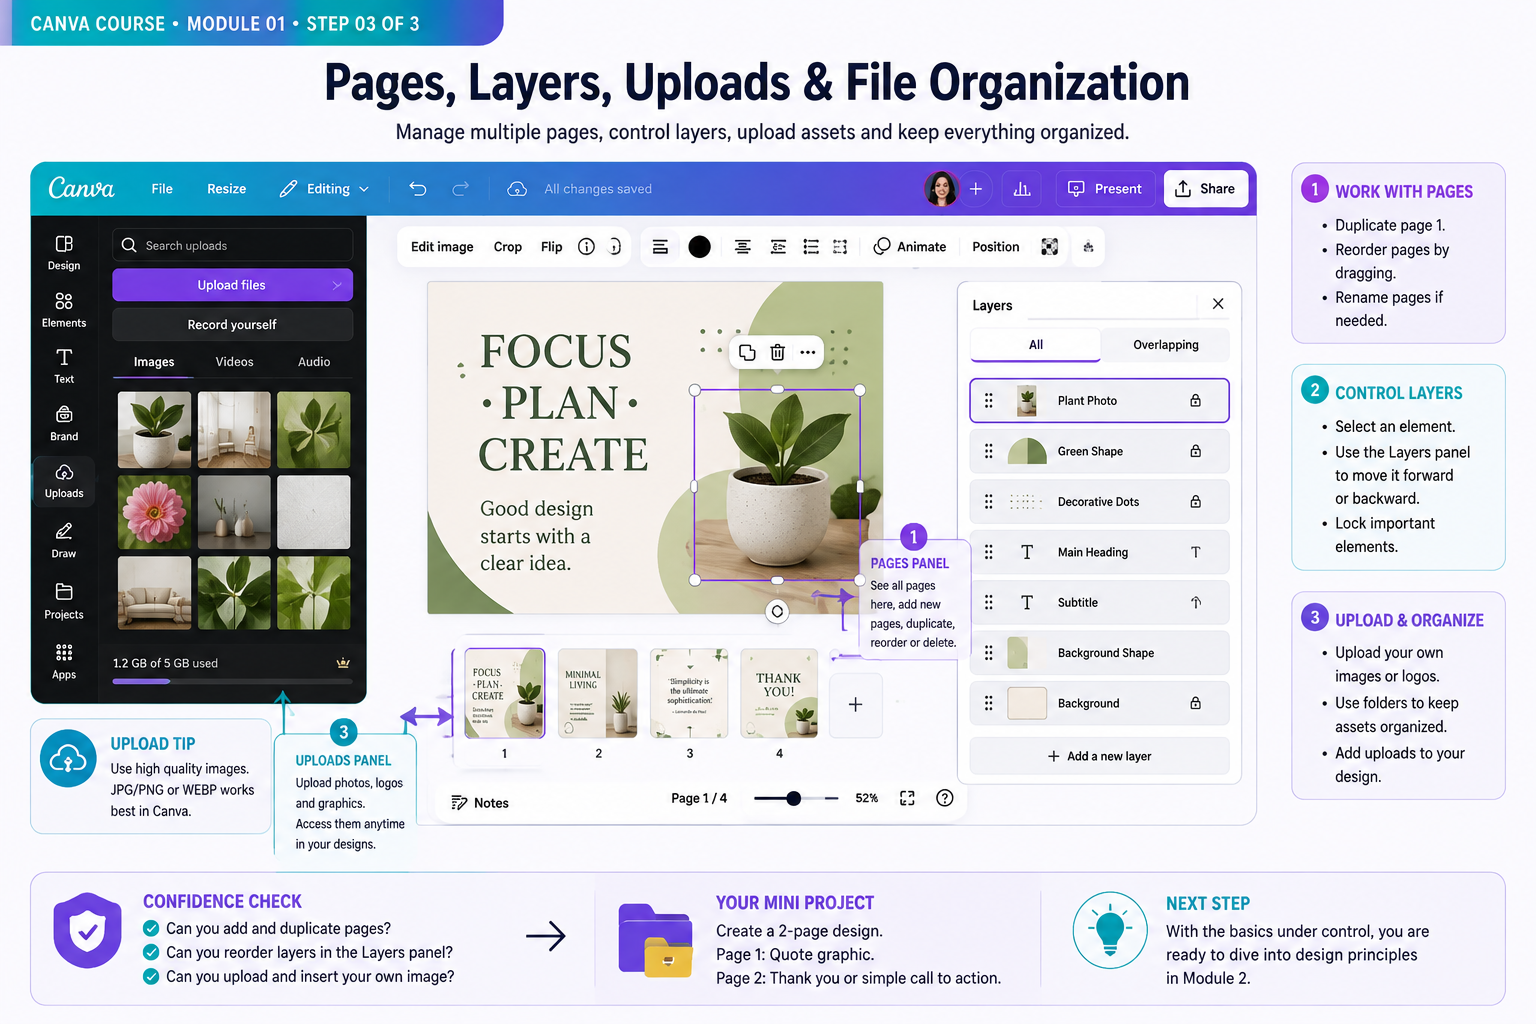
Quality Check & Export — Pages, layers, uploads and file organization
- Practice with pages: duplicate your current page, create one additional page from scratch and drag the page thumbnails into a different order. Notice that pages can belong to the same Canva project while containing different layouts.
- Practice with layers: select overlapping text, shapes and images. Open the Position or Layers controls, move one object forward and backward, then lock an element that you do not want to move accidentally.
- Practice uploads and organization: upload one image from your computer, place it into the design, crop or resize it and keep the project inside your Canva Course Practice folder. Rename the design clearly so you can locate it again later.
How pages and layers solve different problems
Pages organize separate compositions inside one Canva file. A presentation may use one page per slide, a carousel may use one page per card, and a small campaign can keep several related graphics together. Layers work inside each individual page and determine which objects appear in front of or behind others.
Confusing pages with layers is a common beginner mistake. If an object seems to disappear, first confirm that you are viewing the correct page. If you are on the correct page but the object is hidden, inspect its position in the layer order. Understanding this distinction makes larger Canva projects much easier to control.
Build an organization habit from the beginning
Use descriptive project names instead of leaving files with generic titles. A simple naming pattern such as project-purpose-version makes designs easier to locate and compare. For example, you might keep welcome-post-v01, welcome-post-v02 and welcome-post-final while developing an idea.
Folders become increasingly valuable as the number of projects grows. Keep the exercises from this course together and separate practice files from finished work. A clear structure reduces accidental edits and makes it easier to return to a project later without searching through dozens of unrelated designs.
Editable projects and exported files are different
Your Canva project is the working version. It preserves editable text, elements, pages and layout decisions. An exported PNG, JPG or PDF is an output created for publishing, sharing, presenting or printing.
After exporting a practice design, open the exported file outside Canva and inspect it at its intended size. Check text clarity, image quality, margins, cropping and whether every important element appears correctly. This verification habit will become increasingly important when you create social posts, presentations and business documents later in the course.
Knowledge checkpoint
- Can you return to Projects and find this design again?
- Can you identify the side panel, top toolbar, canvas, page controls and zoom controls?
- Can you create, duplicate and reorder pages?
- Can you move an object forward or backward using layer controls?
- Can you upload an image from your computer and add it to the design?
- Can you explain the difference between an editable Canva project and an exported file?
Build this before continuing
Create a clean 1080 x 1080 welcome graphic from a blank canvas. Include at least one heading, one supporting text block, one shape or graphic element and one uploaded image. Then duplicate the page and create a second variation of the design.
Completion standard: organize the project inside Canva Course Practice, give it a descriptive name, verify the layer order, create at least two pages, make three deliberate improvements after reviewing the first version, export a PNG and inspect the exported file.
Remember: this first project is not about creating a masterpiece. It proves that you can navigate and control the Canva workspace before moving into professional design principles.
Ready to move on?
You are ready for Module 2 when Canva no longer feels like a collection of unfamiliar buttons. You should be able to create and find a project, add basic elements, navigate the canvas, manage pages, understand simple layer order, upload an asset and export a finished file without following every instruction on this page.
If one of those actions still feels uncertain, repeat only that part of the exercise. The goal of this module is workspace confidence. Module 2 will use that foundation to focus on the design decisions that make work look intentional and professional.
Building a Reliable Canva Workflow
Confidence in Canva comes less from memorizing every button and more from understanding how the workspace is organized. A beginner should learn to separate three different decisions: what the final asset needs to communicate, which format is appropriate for that purpose, and which tools are actually necessary to build it. Starting with the communication goal prevents the common mistake of opening a template and changing colors before deciding what the design is supposed to accomplish.
Begin by identifying the destination of the design. A presentation slide, Instagram post, printable flyer, PDF worksheet and YouTube thumbnail all have different dimensions and reading conditions. A design viewed on a phone needs stronger hierarchy and larger text than a document intended to be read at full page size. Canva makes resizing and format selection easy, but the designer still needs to choose the correct canvas for the job.
Inside the editor, develop the habit of naming projects clearly. Instead of leaving files with generic names such as Untitled Design, use names that describe the client, campaign or purpose. Clear naming becomes important once dozens of assets accumulate. Folders, duplicated versions and intentional filenames make revision much faster and reduce the chance of exporting or editing the wrong file.
Use the page panel as part of your workflow rather than treating every page as an isolated canvas. Duplicate pages when you want to preserve structure, reorder them when building a sequence and delete experimental pages only after deciding they are no longer useful. This is especially valuable for carousels, presentations and document layouts in which visual consistency between pages matters.
Working With Alignment, Position and Layers
One of the first skills that separates controlled design from random placement is alignment. Canva provides guides, snapping and position tools that help objects line up with one another and with the page. Rather than moving an element until it looks approximately centered, use the alignment feedback that appears while dragging or use the Position controls for precise placement.
Layers matter whenever elements overlap. A photograph may sit behind a shape, while text and icons remain above both. Learn to move elements forward and backward deliberately. If an element appears to disappear, it may simply be behind another object. Understanding stacking order prevents unnecessary deletion and recreation of objects.
Grouping is equally useful. When a headline, icon and supporting label form one visual unit, grouping them lets you move or resize the complete unit without destroying the spacing between its parts. Ungroup only when an individual component needs editing. This becomes particularly helpful when building reusable layouts.
Lock elements that should not move accidentally. Background shapes, logos, decorative elements or structural guides are common candidates. Locking them allows you to edit text and images without constantly nudging the underlying layout. This small habit becomes increasingly valuable in larger projects.
Choosing Templates Without Becoming Dependent on Them
Templates are useful starting points, but they should be treated as systems to understand rather than finished designs to copy blindly. Before changing anything, examine why the template works. Look at the relationship between headline size and body text, the number of colors, the use of negative space, image placement and the repetition of visual elements.
When adapting a template, change content in a controlled order. Replace the main text first, because new text can change line breaks and spacing. Replace imagery next, then adjust colors and decorative details. If every element is changed at once, it becomes difficult to identify which modification damaged the original balance.
A good exercise is to duplicate one template three times and adapt it for three different fictional businesses. Keep the same basic structure while changing typography, colors, imagery and tone. The result demonstrates how a layout can remain structurally useful while the visual identity changes completely.
Eventually you should be able to start with a blank canvas. Use templates to study successful structure, then reproduce similar hierarchy using your own spacing, shapes and type choices. The goal is not to stop using templates; it is to understand them well enough that you control the design instead of the template controlling you.
Exporting With the Final Use in Mind
Export settings should match the destination. PNG is useful for many high-quality digital graphics, while JPG can reduce file size for photographic designs. PDF formats are more appropriate for documents and printable assets. Transparent backgrounds, when available and needed, are useful for logos and isolated graphics that will be placed over other backgrounds.
Before exporting, inspect the design at realistic viewing size. Zooming in can hide problems with hierarchy because everything appears large on screen. Zoom out and ask whether the primary message remains obvious. Check edges, spelling, alignment and whether important elements sit too close to the boundaries of the canvas.
After export, open the actual downloaded file rather than assuming the editor preview is enough. Confirm that the dimensions, page order, image quality and transparency behave as expected. This final verification is part of professional workflow and prevents avoidable mistakes when files are delivered or published.
Workspace confidence develops through repetition. Create small practice assets, deliberately use alignment, grouping, layers and export options, and review the result afterward. The faster you can move through those basic decisions without confusion, the more attention you can devote to actual design thinking.
One final habit that improves workspace confidence is reviewing the project after completion. Identify which tools saved time, which actions caused confusion and which layout decisions required unnecessary correction. This reflection turns each Canva project into practice for the next one and gradually makes navigation, organization and exporting feel automatic.